A Mid-Summer Nights Roast

image
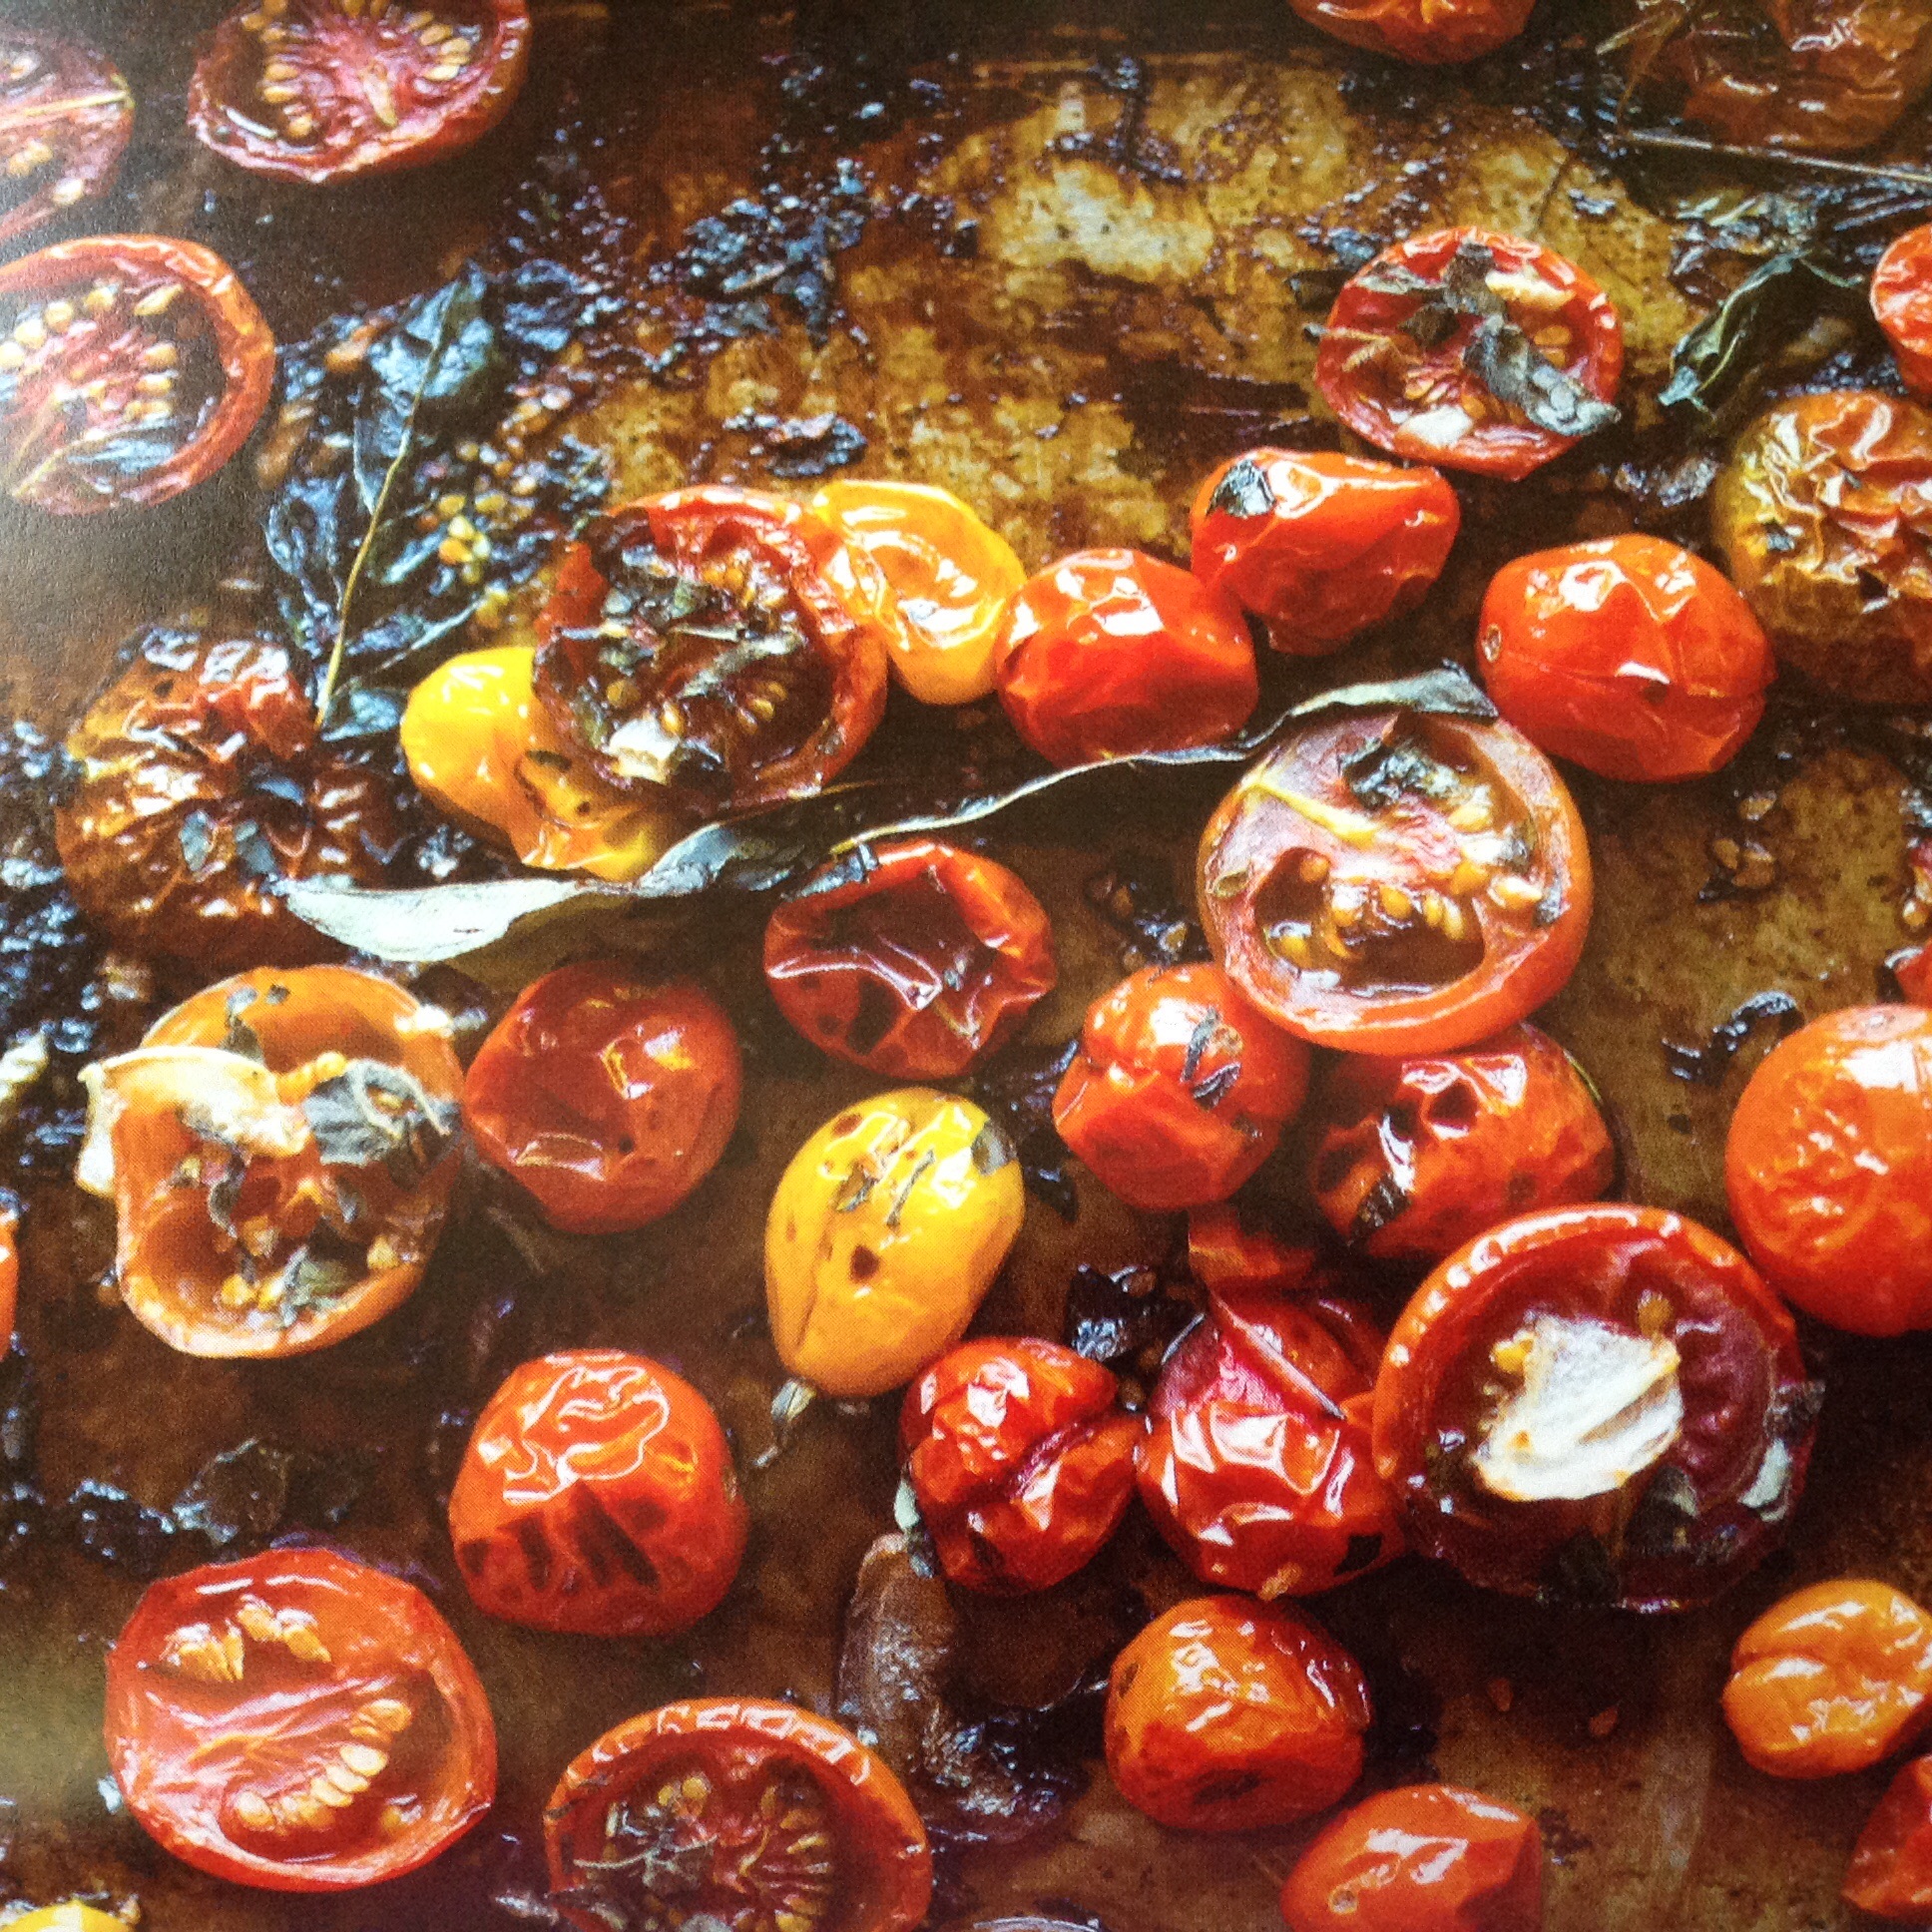
Every year I always plant at least one cherry tomato variety and it seems like every year that plant decides to try and take over the entire tomato patch and produces what seems like thousands of little tomatoes. finding things to do with all those little beauties is another story. they go awesome with just about any salad, homemade hummus, goat cheese, steamed green beans, even just on their own…. so many options, how do you choose? One of my favorite ways to eat cherry tomatoes is to roast them with a little basalmic vinegar, brown sugar, and a mix of herbs. talk about happiness on your tastebuds. and they are really good with any of the foods mentioned above. Try it and let me know what your favorite way is.

What you will need:

  • 2 pints of cherry, grape, or other small tomatoes
  • 1/4 medium red onion, thinly sliced and roughly chopped (optional)
  • 2 tablespoons extra-virgin olive oil
  • 3 tablespoons brown sugar, packed
  • 1 small sprig rosemary, cut in half,
  • OR 2 tablespoons of mixed chopped garden herbs, such oregano, thyme, and basil
  • kosher salt
  • freshly ground black pepper

Preheat the oven to 400 degrees. If the tomatoes are large, slice them in half. On a large rimmed baking sheet, toss the  tomatoes with the onion, (if using). Sprinkle the olive oil, balsamic vinegar, and brown sugar over the tomato and onion mixture. Season with a generous pinch of salt and scatter the herbs on top.

Bake for 10 minutes and stir the tomatoes with a heat-proof spatula, mixing any stray pools of vinegar and tomato juice back together as much as possible. The juice of tomatoes will help deglaze the baking sheet. Bits of vinegar will stick to the spatula; that’s fine (when it cools, it turns into a handy “vinegar candy” snack for the cook). Reduce the oven temperature to 325 degrees.

continue to bake, stir every 10 minutes, until the tomatoes begin to wrinkle but are still very juicy, 20 – 30 minutes, depending on the size, variety, and ripeness of the tomatoes.

Remove the tomatoes from the oven and transfer to a bowl to cool. scraping the baking sheet well, and season with additional salt and pepper to taste.

Refrigerate for up to 1 week

Week Eleven of Summer Shares

Beetles, beetles, beetles!  Boy we have had a battle with the beetles this year and I am afraid they have won.  Of course they take the best and tastiest fruit on the tree or vine. This week will be the last of the peaches and grapes till October.

Ok, while we think we know how to count…We seemed to have an extra box this week…somehow, so if anyone is interested in some extra produce we’ll let it go for $18.

In today’s shares we have O’Henry peaches.  These are a firm and full red peach.  Also a mix of grapes.  Garlic, onion, greens, basil, a sprig of stevia, bell peppers, eggplant, green beans, cherry tomatoes and other mixed veggies.

Stevia is a sweet herb that can be used in smoothies and to sweeten things.  It doesn’t take much to make a sweet flavor…A leaf or two is sometimes enough.  If you don’t use it all, dry it and save it for later.  You will find the stevia in with your basil.

Next week is our last week for summer shares and moving right into fall shares.  Time flew by!  We will have almonds once again next week, and hopefully pears.  Looks like the beefsteak tomatoes will coming on for out last share, as we are now starting to say goodbye the majority of the heirloom tomatoes.

If anyone still has any baskets, don’t forget to return them next week.

Week Ten of Summer Shares

We are recruiting you!  Yes, you don’t have a choice.. This week we have a little work for you, but it will be worth it.  You will find raw form almonds in your share that need to be hulled!  That means you will need to remove the outter shell to keep them from molding and then lay them out to dry and the sooner the better.  It is easier to remove the inner shell when done at this stage, but can wait.  They aren’t in the your box, so be sure to grab a bag!

almonds

Almonds in raw form, from hull to shell to shelled

Also, in your shares today are: Eggplant, walla walla onion, tomatillos, tomatoes, green beans, white and yellow peaches, grapes, peppers, pea shoots, summer squash, cucumbers, and a few other miscellaneous items.

Two weeks to go and fall shares start up September 3rd ~

Green bean in brown butter

My husband is such a trooper. He is my official taste taster for all the recipes I post on here. And he said this is one of the best yet. Hopefully you all agree when you try it.

What you will need

  • About a pound of fresh green beans
  • 3 Tbsp butter
  • 2 cloves garlic minced
  • 1 small onion
  • Fresh ground pepper

Cut the tips off the green beans (they don’t tast very good) and slice the onion in half then in strips. Steam green beans for about 3-5 or until they turn bright green, add onion slices to green beans and steam until beans are tender. While beans and onion are steaming, put the butter in a sauté pan. Cook on medium heat until butter does not foam anymore. ( be careful not to burn the butter) add minced garlic and cook for 30 seconds to a minute. Carefully pour butter mixture on to green bean mixture and stir to coat. Add a little fresh ground pepper and Serve hot.

Grilled Cheese n’ Kale

image

Grilled Cheese are a classic childhood favorite. You just cant go wrong with any version of this food. Plus adding kale helps ensure that you stay full longer, thanks to all the extra fiber that helps slow digestion and nutrient uptake.

What you will need:
4 tablespoons honey mustard
8 thin slices whole wheat bread
4 ounces mozzarella cheese, grated
4 tablespoons unsalted butter
2 cups torn kale leaves

Spread 1 tablespoon of honey mustard on 4 slices of bread, then sprinkle on the cheese, add the torn kale leaves, and assemble the sandwiches with the remaining 4 slices. Butter each side of the sandwich and transfer to a warmed skillet. Cook for 2-4 minutes or until golden brown. Flip sandwich and repeat cook time. Continue to cook until cheese is melted. Transfer sandwiches to a cutting board and cut in half or quarters. Serve immediately.

Week Nine of Summer Shares

Ok, so it’s been a buzzing week here! So short and sweet it is today…Peaches (white & Elberta), grapes, green onions, kale, cucumbers, Sweet peppers, jalapeno peppers, summer squash, beans, basil, mint, cherry tomatoes, tomatoes and various other veggies this week.  Plenty of extra microgreens and eggs this week as well.

Only three weeks to go.  Next week we will have green beans and in more abundance.  Hoping to harvest the first of winter squash as well.  Almonds in raw form.  These will have two shells.  While they will keep a long time in there inner (brown) shell, the husk (outer) should be removed.

Home made butter and dinner rolls

image I love rainy days, (they bring out the in cook in me). There is nothing better than the smell of baking bread on a day where its cool and overcast. So to start you will need to make your butter.

  • Whipping cream
  • a pint mason jar with lid
  • a strong arm

you can measure out the cream if you want to or be spontaneous and guess. Note; (1 cup of cream makes about 1/2 cup butter and 1/2 cup butter milk) I filled my mason jar about 1/2 full, put the lid on, and shook it for about 10 minutes roughly. shake until the butter and butter milk separate. For the first 5 minutes or so it will just be like shaking a jar of milk, then it will get hard to shake because it now has turned to whipped cream, keep shaking and all of a sudden it will get sloshy sounding again. this is your butter forming into a ball with the buttermilk being left over. save the buttermilk for baking. gently rinse your butter under cold water to rinse the rest of the butter milk out. This will help your butter keep longer and keep it from turning rancid fast. store in the fridge for up to  5 days. (you can add salt or other flavoring to your butter after you rinse it.( ex: garlic, cinnamon, honey, ect.)


Dinner Rollsimage

  • 3 1/2 tsp active dry yeast
  • pinch of sugar
  • 1/3 cup warm water
  • 1 cup of tepid buttermilk (use the byproduct from your butter)
  • 1/4 cup sugar or 1/4 cup honey
  • 1/2 cup unsalted butter, melted
  • 2 large eggs, lightly beaten
  • 1 tsp salt
  • 4 1/2 -5 cups flour, plus extra as needed
  • canola oil for greasing

In a glass measuring cup, sprinkle the yeast and pinch of sugar of the warm water and stir to dissolve. Let stand until foamy, about 10 minutes.

In a stand mixer fitted with the paddle attachment, combine the buttermilk, sugar, melted butter, eggs, salt, and 1 cup of flour. Beat on medium-low speed until creamy, about 2 minutes. Add the yeast mixture and another cup of flour, and beat for another minute. Beat in remaining flour, 1/2 cup of flour at a time, until the dough pulls away from the bowl sides. Switch to the dough hook. Knead the dough on low speed, adding flour 1 Tbsp at a time if the dough sticks, until a very soft dough forms, about 1 minute. The dough should be softer than typical bread dough, yet smooth and springy.

Transfer the dough to a deep oiled bowl and turn the dough once to coat it with oil. Cover loosely with plastic wrap and let rise at room temperature until doubled in bulk, about 1 1/2 hours.

Grease two 8 inch round cake pans. turn the dough onto a lightly floured work surface. divide the dough in half and roll each half between your palms into a 18 inch rope. Cut each rope in to eighteen 1 inch pieces. Shape each piece into a ball, and place the balls, sides just touching, in the prepared pans.  Cover loosely with plastic and let rise at room temperature until puffy, 30-45 minutes.

preheat oven 375 degrees. Bake the rolls until light golden brown. 18-23 minutes. Let cool slightly in the pans or transfer to a rack. serve warm.

side note: I made another small batch of butter to eat with my rolls, but this one I added a pinch of salt too. also these rolls are really good with a peach raspberry jam.

Bloomin Apple 

This is for all you apple pie lovers. Every so often I get a craving for a home-made apple pie. But being only two of us that eat pie at my house, the third being to little too. the pie does not get eaten in one setting. It will either sit in the fridge till it goes bad or I will attack it with a fork and sneak a bite every time I open the fridge door. So to save myself from eating the rest of it then regretting it later, I found this awesome recipe. Where I can have my pie and eat it too.

What you will need:

  • 2 large apples (honeycrisp or another sweet variety)
  • 2 tablespoon butter
  • 3 tablespoon brown sugar
  • 1 tablespoon flour
  • 1 teaspoon cinnamon
  • 4 Werthers Original soft Carmel chews ( 2 per hole)
  • vanilla ice cream

Preheat the oven to 375 degrees.

To get the blooming apple look, you need to cut the apples. Slice off the top ¼ to ⅓ of the apples. Scoop out the core. I don’t have an apple corer so I used my metal ½ teaspoon measuring spoon. Then, use a thin knife to make two, deep circular cuts around the center of the apple. Next, turn the apple over and make narrow cuts all the way around the apple. Flip it back over and you can see all of the cuts.

imagePlace the apples in an oven safe dish and put two caramel into the center of each apple.

Heat butter and brown sugar in the microwave for 30 second, stir and continue heating for an additional 30 seconds. Remove from the microwave and stir in flour and cinnamon. Divide the mixture over the top of the two sliced apples.

Bake at 375 for 25-30 minutes. (Check apples after 25 minutes and continue cooking until tender. Some apples can take 45 min to 1 hour to soften.)

Remove from the oven and use a large spoon to move the apples into bowls.

Top with a scoop of ice cream, drizzle with caramel and sprinkle with cinnamon. The ice cream will cause the caramel in the center to harden so eat quickly or put the ice cream scoop on the side.

ENJOY!

P.S. this recipe will make your house smell so good, you will leave just long enough to walk back in and take a deep breath.

Week Eight of Summer Shares

Desert Sage Week Eight Share

Desert Sage CSA Week Eight Share

What a busy week we have had once again.  Lettuce galore for fall shares have been going in the ground. Yes in July!  Cabbage, cauliflower, napa cabbage, kale, turnips, beets, carrots, savoy cabbage and so many other things are getting set in the ground this week as well.  It’s hard to believe in just a few days it’s August with four shares left to go.

We have been putting shares in stack-able boxes lately.  These make it much easier for use and seems to help with not squishing our fruit.  Please return these..  Yes, they are just a cardboard box, but it does take more time to gather them if we run out.  Thanks for you help with this!

So what’s in this weeks shares?  Asian Pears.  Let these get a slight yellow hue for best flavor.  A few apples, cucumbers, walla walla onions, peppers – both bell and hot, tomatoes, grapes, garlic, napa cabbage OR Asian greens, pea shoots, rosemary and  other mix of veggies.

If you are wondering what to do with pea shoots, just add them sandwiches, top a salad or steamed vegetables.  If you don’t know how good rosemary is for you we’ll share some information!  Rosemary improves digestion, enhances memory and concentration (could use that!), is a rich source of antioxidants and anti-inflammatory compounds, neurological protection, helps prevent brain aging, good for eye health and protection against macular degeneration.  Now!  If that doesn’t motivate you to use your rosemary, I don’t know what would!!  So you don’t use it all…Dry it.  Just leave it out hanging or on a clean paper towel until dry, then strip the leaves off and store for winter use.

Next week we will have microgreens again.  We grow extras for those who would like more than what’s in their share.  We are hoping for green beans, but honestly, we are having a hard time guessing what plants and crops want to do this year!  Also, okra is just around the corner (a week or two), so find some delicious recipes.  It really isn’t just a nasty slimy vegetable if prepared correctly.

Update on fall shares.  We have a few left, but our Thanksgiving baskets are fulfilled.  Fall shares include many winter squash varieties, pumpkins, greens, root crops and other savory veggies.  Fall is our favorite time of the year.  Perhaps it’s because it cooler, but the vegetables are totally amazing to cook with!

See ya’ll later today!

Grilled peach salad

image

I don’t know about all of you, but with the humidity and heat of summer its hard to figure out what to make for dinner. Something that’s not to heavy but still satisfying. So while I was putting together the CSA baskets this morning I got to looking at all that fabulous fresh produce and it just clicked. Why not a fresh salad with something sweet like peaches or even pears on it.

  • 1/4 cup honey
  • Salt and freshly ground black pepper
  • 4 firm but ripe peaches, halved and pitted
  • 1 Tbsp extra-virgin olive oil
  • 1/4 cup of toasted pecans
  • Feta cheese
  • Arugala salad mix

Prepare a grill for direct-heat cooking over medium-high heat ( or use a stove top grill pan) oil the grill grates to prevent sticking.                                                   In a small bowl, combine the honey, a pinch of salt and 1 tsp pepper. Brush the peach halves with olive oil and place on grill, cut side down. Cover the grill and cook until the peaches just begin to soften, 3-4 minutes. Turn the peaches and brush with honey mixture. Cook until tender but not falling apart, 2-3 minutes longer. (Serve either cooled or hot off the grill) on a bed of Arugala, sprinkle with feta cheese. And enjoy